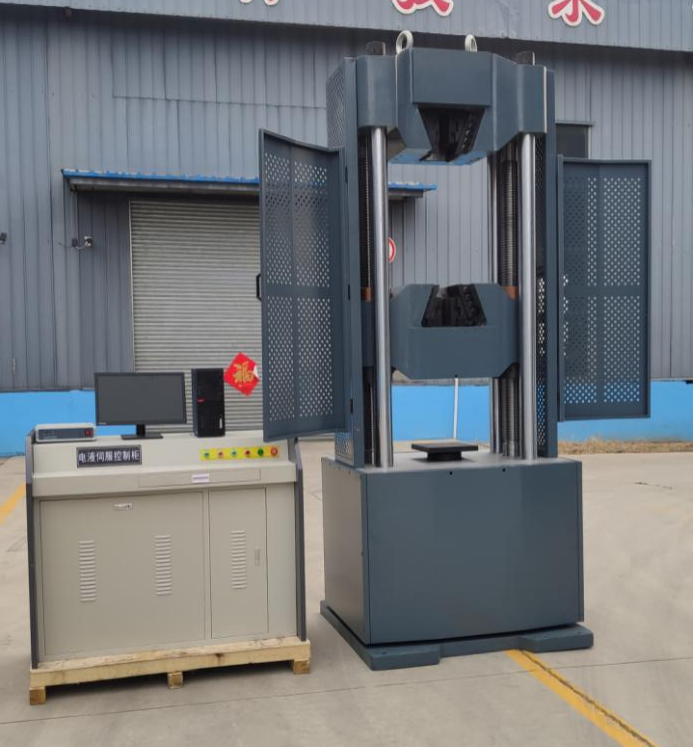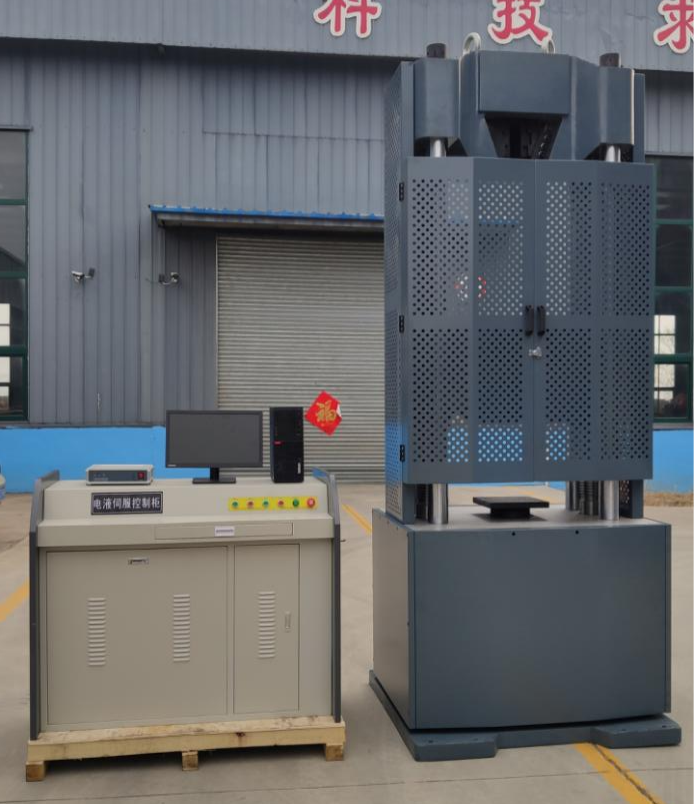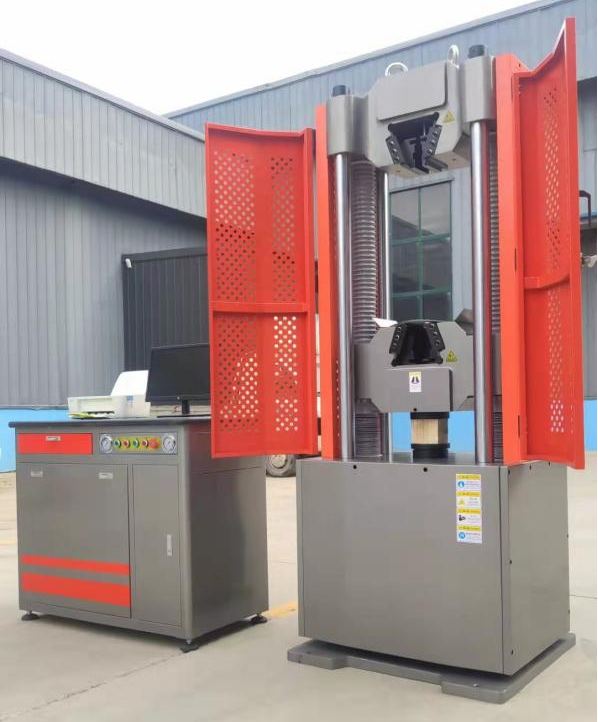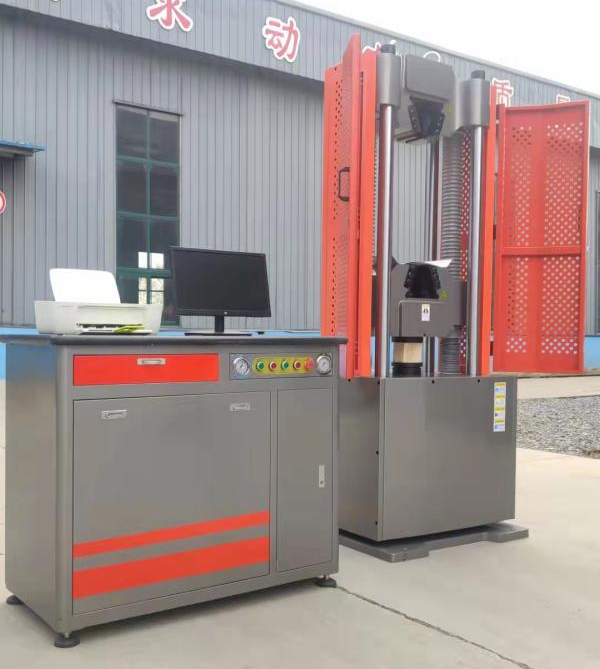
Microcomputer-controlled electro-hydraulic servo universal testing machine WAW-2000E
I. Equipment Name: Microcomputer-Controlled Electro-Hydraulic Servo Universal Testing Machine
Equipment model: WAW-2000E
II. Introduction;
1. The WAW-2000E microcomputer-controlled electro-hydraulic servo universal testing machine integrates automatic control, automatic measurement, data acquisition, screen display, and test result processing. It utilizes a lower-mounted cylinder host platform, featuring a four-column, two-screw, lower-mounted cylinder design, a semi-open high-strength beam, built-in hydraulic clamping, and a tensile space located above the host. The compression and bending test spaces are located between the lower beam of the host and the workbench. The measurement and control system employs a fully digital multi-channel closed-loop measurement and control system with three closed-loop functions, allowing for stress, strain, displacement closed-loop control, and shock-free switching. Its stress speed and strain rate fully comply with national standards such as GB/T228.1-2010 and other metal tensile testing standards. The manufacturing strictly adheres to the following standards: GBT228[1].1-2010 Metal Materials - Tensile Testing: Room Temperature Test Method, GBT 10623-2008 Metal Materials - Mechanical Property Testing Terminology, GB/T 2611-2007 General Technical Requirements for Testing Machines, GB/T8612-2015 Electro-hydraulic Servo Universal Testing Machine, GB/T228 Metal Materials - Room Temperature Tensile Testing Method, GB/T7314 Material Room Temperature Compression Testing Method, JJG 1063-2010 National Metrological Verification Regulation, GB/T 16825-2008 Static Uniaxial Testing Machine Inspection, JJF 1103-2003 Evaluation of Computer Data Acquisition Systems for Universal Testing Machines, and GB/T 22066-2008 Evaluation of Computer Data Acquisition Systems for Static Uniaxial Testing Machines.
2. Scope of application: Primarily used for tensile, compressive, bending, and other tests on metals and non-metals. Applicable to fields such as metallurgy, construction, light industry, aviation, aerospace, materials science, universities, and research institutions. The test operation and data processing comply with the requirements of GB/T228-2010 "Room Temperature Materials - Metallic Materials - Tensile Testing Method".
III. Structural characteristics of mechanical processes;
1. The mainframe of the testing machine adopts a lower-mounted hydraulic cylinder structure. The stretching space is located above the mainframe, while the compression, bending, shearing, and other testing spaces are located between the middle crossbeam and the workbench below the mainframe. The testing space is adjusted by moving the middle crossbeam. The workbench is in hard contact with the hydraulic cylinder, and the medium-pressure balance piston is always positioned at the center of the hydraulic cylinder, reducing friction between the hydraulic cylinder and the piston, thus achieving higher experimental accuracy and more precise force values. This overcomes the traditional process of spherical contact between the workbench and the piston, guided by theory, thereby ensuring the stability of the mechanical properties of the product.
2. The structural components of the main machine are made of steel castings that undergo precision machining after heat treatment. The columns and transmission parts are precisely crafted from high-performance alloy structural steel. After rigorous inspection and meticulous assembly, the entire machine not only exhibits strong overall rigidity but also good stability. Both the main and auxiliary hydraulic cylinders utilize clearance-free oil film seals to prevent oil leakage. The clamping jaw adopts a central compound hydraulic cylinder for direct-thrust clamping, which overcomes the drawbacks of the sliding and deformation-prone structure of the support plate and lining plate clamping block assembly. Moreover, it is very convenient for loading, unloading, and replacement, and is durable.
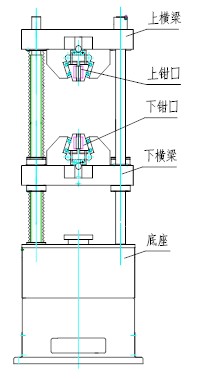
Schematic diagram of host structure
IV. Hydraulic system;
The hydraulic oil in the oil tank is driven by a three-phase asynchronous motor to enter the oil circuit through a high-pressure pump, passing through a high-pressure oil filter, a hydraulic valve group, a pressure differential valve, a servo proportional valve, and a directional valve, and then enters the oil cylinder. The computer sends a control signal to the servo proportional valve to control the opening gap of the valve core, and then receives feedback through the pressure differential valve. Subsequently, the directional valve receives the signal, thereby controlling the flow entering the oil cylinder to achieve control of constant test force, constant displacement, etc.
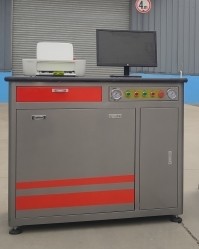
Standard electro-hydraulic proportional control oil source diagram I
4.1 Hydraulic principle
As shown in Figure 2, it is a load-adaptive oil inlet throttle speed regulation system.
The hydraulic oil in the oil tank is driven by a motor through a high-pressure gear pump into the oil circuit, passing through a check valve, a 10μ high-pressure oil filter, a pressure differential valve assembly, and a servo valve, before entering the oil cylinder. The computer sends control signals to the servo valve, controlling the opening and direction of the servo valve, thereby regulating the flow entering the oil cylinder and achieving control of constant test force, constant displacement, and other parameters.
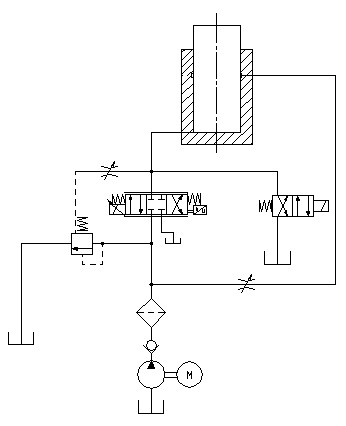
Figure 2: Hydraulic Schematic Diagram
4.2 Features:
1) It is a load-adaptive oil inlet throttle speed control system, designed and manufactured using mature technology and modular units according to standards, specifically for use with microcomputer-controlled hydraulic universal testing machines;
2)We have chosen the Italian Mazzucci high-pressure, internal gear pump, paired with a three-phase asynchronous motor, renowned for its reliable quality, stable performance, and smooth pressure.
3)The load-adaptive throttle speed control valve, independently developed and produced using proprietary technology, ensures stable system pressure, adaptive constant pressure difference flow regulation, zero overflow energy consumption, and is easy to implement PID closed-loop control;
4) Pipeline system: The pipeline, joints, and their sealing components are selected from stable sets to ensure reliable sealing of the hydraulic system and prevent oil leakage failures.
5) The integrated design of the power system and the operation console facilitates operation and saves experimental space.
6) The surface has undergone a powder coating process, resulting in an aesthetically pleasing appearance.
V. Electrical Control System:
1) All strong current components of the system are concentrated in the strong current control cabinet, achieving effective separation between the strong current unit and the weak current measurement and control unit, ensuring that the measurement and control system operates stably and without interference for a long period of time;
2) The electric control cabinet is equipped with manual operation buttons, including power switch, emergency stop, and start/stop of oil source and oil pump.
6. High-resolution digital controller (software introduction):
1) The system is primarily composed of a PC computer, utilizing full digital PID regulation, coupled with a PC card-based amplifier, measurement and control software, and data acquisition and processing software. It enables closed-loop control of test force, specimen deformation, and piston displacement, as well as smooth switching between control modes;
2) The system consists of three signal conditioning units (test force unit, cylinder piston displacement unit, specimen deformation unit), a control signal generator unit, an electro-hydraulic proportional valve drive unit, an electro-hydraulic proportional oil source control unit, necessary I/O interfaces, and a software system;
3) Closed-loop control circuit of the system: Measurement sensors (pressure sensors, displacement sensors, deformation extensometers) together with electro-hydraulic proportional valves, controllers (various signal conditioning units), and control amplifiers form multiple closed-loop control circuits, achieving closed-loop control functions for test force, cylinder piston displacement, and specimen deformation of the testing machine. It features multiple control modes such as constant rate test force, constant rate piston displacement, and constant rate strain, and can achieve smooth switching between control modes, providing greater flexibility to the system.
6.1. PC board card-type automatic control amplifier dedicated for testing machines:
1). The professionally developed PC board and control amplifier for the testing machine form an advanced external integrated controller, which is designed specifically for the testing machine using advanced computer bus control technology. It features programmable analog amplifier, A/D conversion, digital acquisition channel, digital I/O, etc;
2) This dedicated measurement and control card, when combined with a PC, forms a single-card measurement and control system. It can be directly connected to sensors for measurement, control, and data acquisition, making the complex measurement, control, and data acquisition system simpler and more reliable;
3) Utilizing computer bus technology, it is directly inserted into the computer expansion slot. With an all-digital circuit, zero adjustment, gain adjustment, and other functions are all implemented through software. It represents the latest product unit in the development of measurement and control technology for testing machines;
4) A gain-programmable cascaded amplifier can achieve amplification factors with different gains;
5) The sensor bridge power supply and the reference voltage of the A/D chip share the same voltage, resulting in proportional attenuation of the entire measurement system, thus realizing hardware compensation technology for the bridge power supply;
6) By utilizing multiple A/D converters, the sensitivity and resolution requirements of the system are met, avoiding the degradation of system characteristics caused by software frequency doubling methods.
6.2 Introduction to interface operation:
1) The fully digital control system represents the highest level of control system development, achieving closed-loop control of test force, specimen deformation, piston displacement, and test process. It possesses control functions such as constant stress, constant strain, constant test force, constant displacement, test force maintenance, and displacement maintenance, as well as screen display functions for test force, peak value, specimen deformation, piston displacement, and test curve. The fully mouse-input operation and intelligent control mode expert system enable arbitrary setting of control modes and smooth switching between various control methods, providing maximum flexibility to the system.
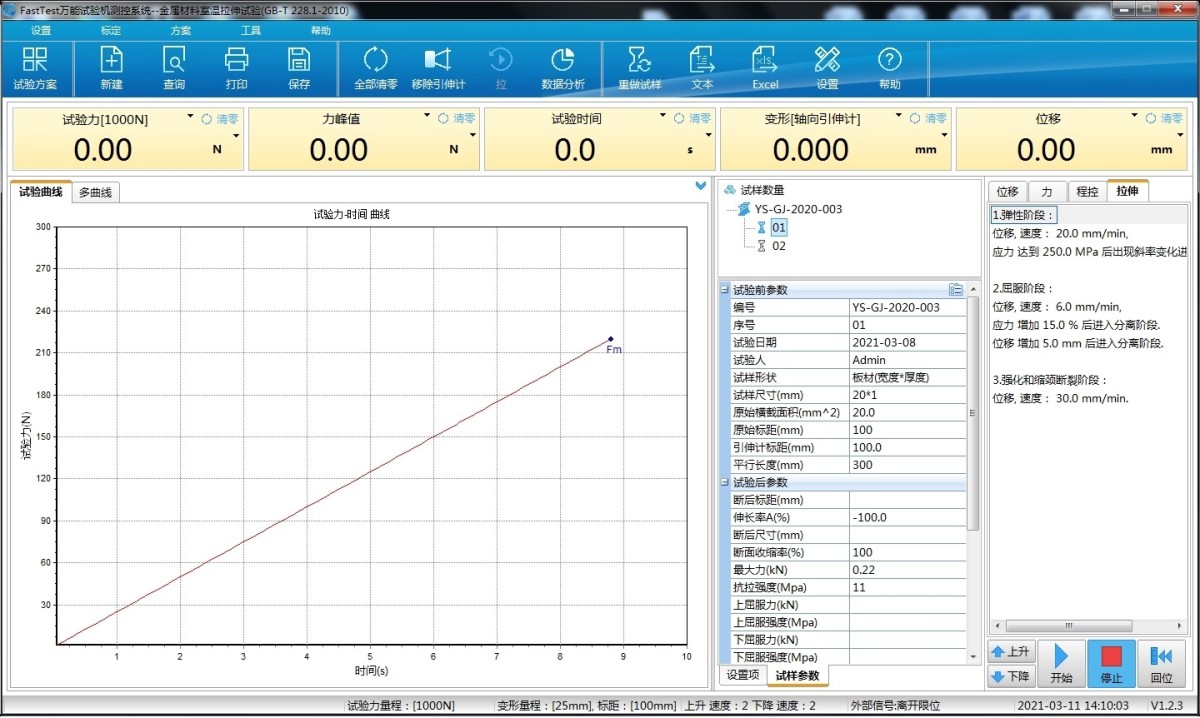
2) It can complete data processing for tests in accordance with the requirements of GB228-2010 "Metallic Materials - Tensile Testing at Room Temperature". The testing process can simulate and reproduce the test data for further analysis. It includes various control methods, among which single-step program control includes multiple closed-loop control methods such as constant stress, constant strain, constant displacement, displacement hold, and force hold. Multi-step program control includes metal tensile testing, etc. In metal tensile testing, it can automatically calculate parameters such as Fm, Rel, Reh, Rp, Rt, Agt, Z, A, Rm, etc., and can also manually identify parameters such as Fel and Fm, and print results accordingly. It can print reports and curves with different contents according to requirements.
3) Utilize the variable structure PID control algorithm to regulate the loading process, ensuring that the isokinetic control error is ≤1% and the pressure maintaining control error is ≤0.5%;
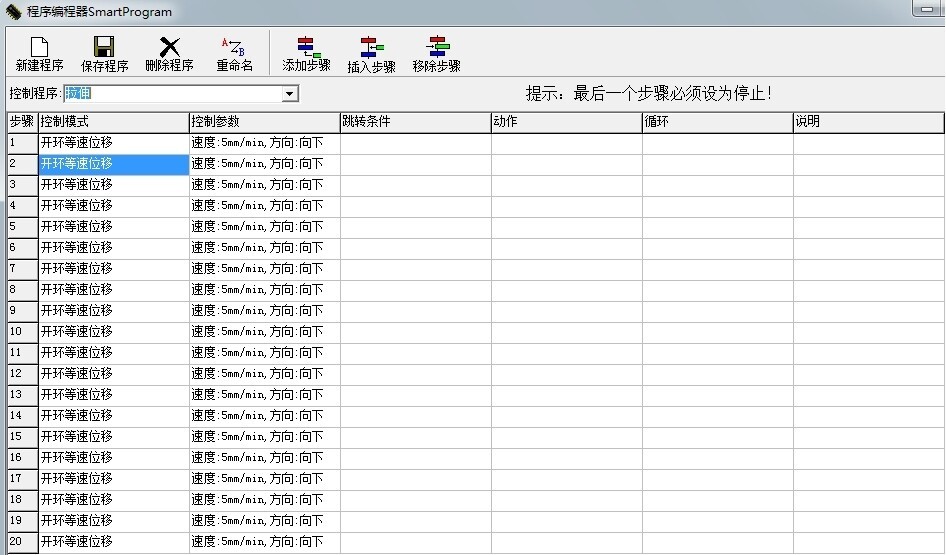
Provide professional users with "control program editor" software, allowing them to flexibly customize specific control programs according to their actual needs;
4) Multiple control modes are available for automatic program control.
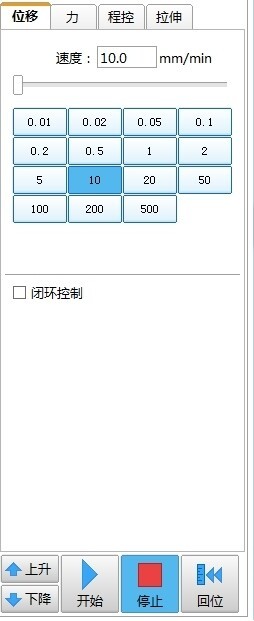
5) The test software based on the Windows XP operating system features a fully digital programmable amplifier that ensures automatic zero adjustment and sensor calibration through computer control. It allows for user access management with different levels of permissions, and possesses multiple graphical display windows and unit conversion functions.
6) Automatic program-controlled intelligent expert system. The maximum number of automatic program-controlled steps can reach up to 50.
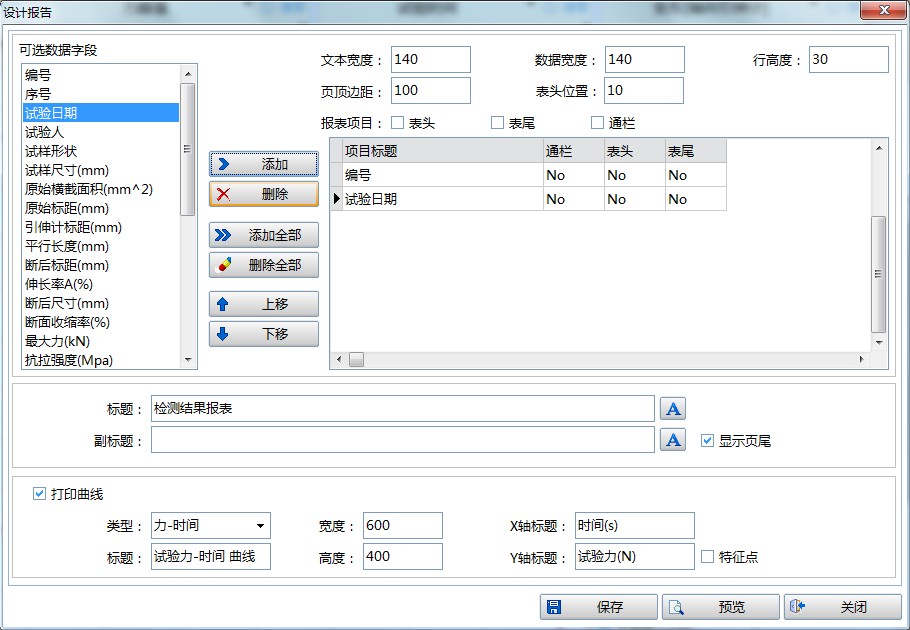
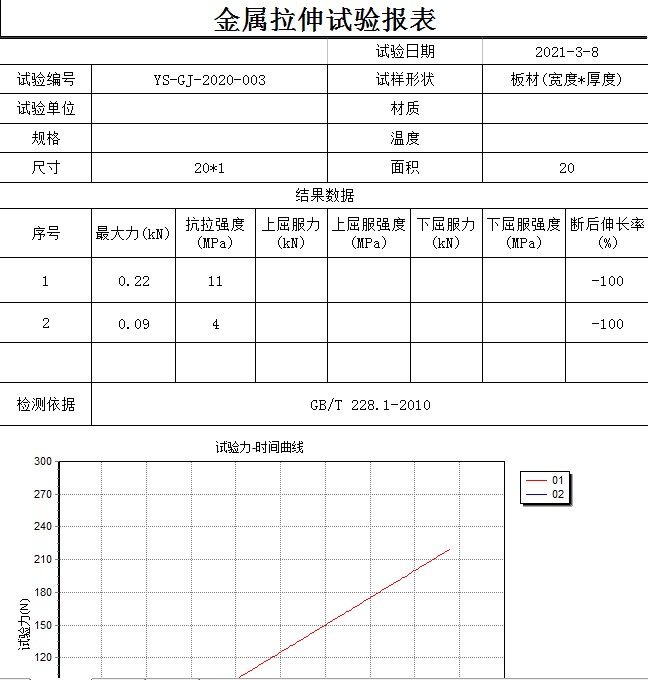
7) Report editing:
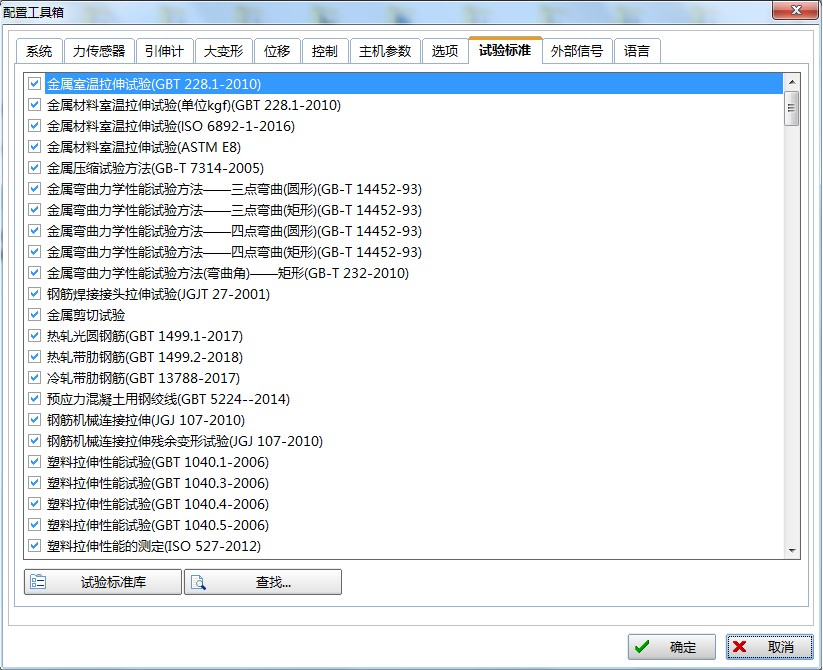
8) There are various types of test methods to choose from
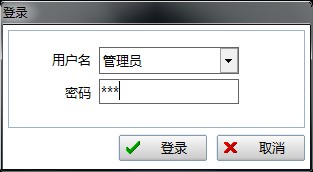
9) The software is equipped with three levels of administrative permissions, each accessible through its respective password, further ensuring the secure use of the software.
VII. Safety protection device
When the test force exceeds 3% of the maximum test force, overload protection is activated, and the oil pump motor shuts down.
When the piston rises to the upper limit position, the limit protection engages, causing the oil pump motor to stop.
When the beam descends to the preset position, it triggers the limit protection, causing the reducer to stop.
8. Functional Features
1)Flexible protective devices are installed on the sliding surfaces of the lower beam and the upper part of the clamping plate, ensuring that oxide inclusions do not fall into the sliding surface of the working clamping jaw and clamping jaw plate during specimen stretching, thereby extending the service life of the clamping jaw plate.
2)The upper and lower clamping jaws are equipped with a rear-mounted dual-cylinder hydraulic automatic clamping fixture, which is controlled by a freely movable hand control box (this hand control box controls the clamping and releasing of the upper and lower clamping heads, as well as the lifting and lowering of the lower crossbeam) for incremental control.
3)The processing of all parts and components of the product is controlled and managed under the company's internal ISO9001 quality management system. The key components purchased from external suppliers are all imported with original packaging, effectively improving the precision and long-term stability of the equipment.
4)By adopting a unique pressure servo technology, the working pressure of the hydraulic cylinder always varies with the magnitude of the load, thereby reducing the noise during equipment operation, lowering the oil temperature, and enhancing the precision of hydraulic control.
5)The unique piano-table style oil source cabinet is highly integrated and easy to operate, effectively reducing the footprint of the product.
6)Multiple high-speed CPUs work in parallel, achieving true multitasking and simultaneous operation.
7)Module unit: Various accessories are interchangeable flexibly, and the electrical hardware adopts an industrial control bus system, facilitating functional expansion and maintenance.
8)The modular structure compatible with industrial control bus slots facilitates easier functional expansion and more convenient maintenance services.
9)The acquisition card with high precision of ±500000 code and a resolution of up to 1/±500000 code maximizes the measurement range of the sensor.
10)Utilizing the PnP (Plug and Play) technology of computers and Windows systems, the inserted card is automatically recognized.
11)The backup support for sensor correction data ensures highly reliable data measurement accuracy.
12)The scene-based operation menu display makes switching between different menus simple and clear.
13)The active test platform position memory function enables the protection of test platform positions set by software.
14)The digital counting frequency can reach up to 10M, ensuring that there is no omission in the counting of displacement and large extension digital values.
15)The anti-jitter frequency multiplication technology of encoder signals can improve the resolution of displacement and large extension by several times.
16)The closed-loop control function of any channel not only achieves closed-loop control of load, displacement, and strain.
17)The rapid and independent overload protection function promptly safeguards the equipment in case of overload.
18)The associated three-level test platform position limit ensures foolproof protection.
19)Software system: A software package designed for the Chinese Windows' 2000/XP platform, featuring an elegant and user-friendly interface. It incorporates software operation authorization management capabilities. Operators log in with a password, and only after system confirmation can they launch the testing software.
20)Multiple uses: It can conduct tensile, compressive, bending, shearing, peeling, tearing, and other tests on metals, non-metals, and components. It can meet various test method standards such as ISO, JIS, ASTM, DIN, GB, etc.
21)Simple operation: With operation guides and online help functions, the system is very easy to operate.
22)Automatic input of sample size: The computer automatically collects the sample size, greatly reducing the cumbersome input required by operators after measuring the sample size, and also avoiding deviations in test results caused by re-input errors.
23)The testing method is programmable, allowing users to develop their own testing methods based on different experimental requirements.
24)Memory return: After the test is completed, remove the test sample button, and the upper jaw can automatically return to the initial test position.
25)Automatic calibration: The load and elongation can be automatically calibrated according to the applied standard values.
26)Automatic identification: After the sample is damaged, it automatically identifies and stops to prepare for the next working procedure.
27)Peak hold: During the testing process, the maximum value of the test item is continuously displayed on the screen as the experiment progresses.
28)Control modes: It features multiple control modes such as displacement control, force control, elongation control, stress control, strain control, constant load, and constant strain.
29)Editable complex test procedures: For example, it can be divided into four stages. The first stage: preloading. The other three stages can arbitrarily choose from six control methods: displacement control, load control, elongation control, strain control, stress control, and speed. The control parameters for each stage can be set arbitrarily, and automatic switching without impact is possible.
30)Easy to zero: Load, elongation, and displacement can be manually zeroed by pressing a single button. The system can also automatically perform zeroing at the start of the test.
31)Data editing: After the experiment is completed, data can be edited on the experimental curve using a mouse.
32)The unique displacement method is used to determine the yield strength of materials without obvious yield, which specifies the non-proportional elongation stress Rp0.2.
33)Multiple curves: Users can choose from various curves such as true stress-strain, engineering stress-strain, load-extension, load-time, stress-time, and strain-time. One curve can be displayed in real-time, and users can switch to display other curves as needed.
34)Curve comparison: The curves of the same group of samples can be superimposed for comparison and can also be printed.
35)Extended analysis: Any segment on the experimental curve can be subjected to local amplification analysis.
36)Report programming: Capable of generating various report formats according to user requirements
37)Automatically calculate: Fm ( Fb ), Feh, Fel, Fp, Rm (σb), ReH (σsu), ReL (σsl, σs), Rp0.2, Rp0.1 (σp0.2), Rp0.05 (σp0.05), Rp0.5 (σp0.5), E, Et, Ec, Z(ψ), A (δ), τ, and other GB/T 228-2010 standard test parameters, and can choose to output parameters. Data files can be stored in multiple formats.
Powerful testing software that can be networked with detection data management software.
IX. Main performance and technical indicators;
1. Maximum test force: 2000kN;
2. Test force measurement range: 1%-100%;
3. Accuracy of test force indication: ±0.5%;
4. Displacement measurement resolution: 0.01mm;
Control range of displacement rate: 0.5mm/min. – 100mm/min;
5. Deformation measurement: Standard gauge length is 100mm, with a maximum deformation capacity of 25mm
6. Deformation measurement accuracy: ±0.5%
7. Control Range of Stress Rate: 1-60Mpa/S;
8. Control accuracy for constant force, constant deformation, and constant displacement:
When the set value is less than 10%FS, it should be within ±1.0% of the set value When the set value is ≥10%FS, it should be within ±0.5% of the set value
9. Deformation rate control accuracy: When the rate is less than 0.05%FS, it is within ±2.0% of the set value When the rate is ≥0.05%FS, it is within ±0.5% of the set value
Adjust Range of Test Stress Rate: 1N/mm2S-1 – 60N/mm2s-1
Adjust Range of Test Strain Rate: 0.00025/S – 0.0025/S
10. Maximum piston movement speed: 100mm/min;
11. Maximum tensile testing space: 1100mm (including piston stroke)
12. Maximum compression test space: 1050mm (including piston stroke)
13. Clamping thickness for flat specimens: 0-50mm, 50-70mm
14. Diameter of round sample clamping: Φ10-Φ20, Φ20-Φ40, Φ40-Φ70mm
15. Pressure plate size: φ300mm
16. Bending test support roller spacing: 600 mm
17. Roller width: 140mm
18. Piston stroke: 250mm
19. Clamping method: Built-in hydraulic clamping
20. Amplifier: Programmable amplifier installed in the PC, capable of automatic zeroing and calibration
21. Overall dimensions: Main unit: 1260×1150×3202mm
Oil source: 1140×700×930mm
23、Overall weight: 9000 kg
24、Oil source: 200kg
X. System Configuration List
Eleven: Installation of the testing machine
1.Installed on a stable workbench or on a flat and solid ground;
2.Try to stay away from places with high air mobility, such as doors and windows;
3.There is no significant electromagnetic field interference in the environment;
4.Prevent exposure to direct sunlight or proximity to air conditioning equipment, etc;
5.Ambient temperature: 20±5℃ with fluctuations less than 2℃ per hour; relative humidity: ≤80%;
6.Power frequency: 50Hz;
7.Power supply voltage: AC 380±10V, 50Hz, power 5.0KW.
8.The power supply must have a grounding wire, and users should pay special attention to this. As the machine has grounding protection, if a power supply without a grounding wire is used, there is a risk of electric shock and injury in case of leakage.
9. Level adjustment: Place the level gauge on the platform surface of the testing machine and adjust the four adjustable legs below to ensure that the testing platform of the testing machine is level. At this point, the main unit is installed.
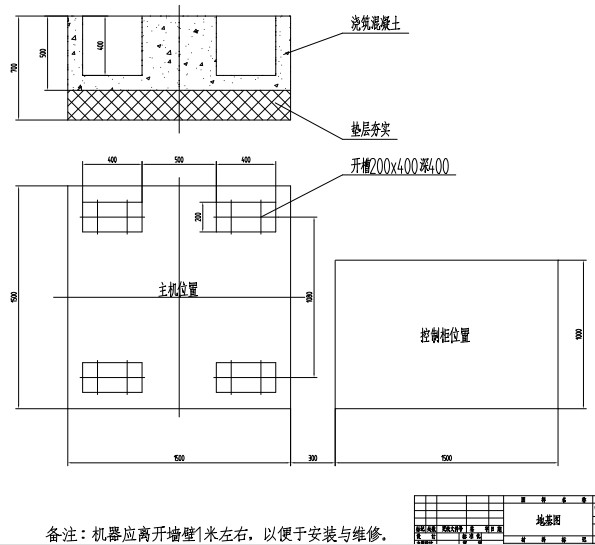
XII. Foundation soil
If you are interested in our products, please fill in the message below to contact us and get a quote!
We will get back to you as soon as possible!
Type What You are Looking for
